
How to remove google nest doorbell? Nest Doorbells have revolutionized domestic safety by using imparting convenience, protection, and peace of mind. However, to make certain foremost performance and durability, it’s critical to understand how to correctly get rid of and rate your device.
This comprehensive guide on “a way to remove google nest doorbell to rate” will stroll you through the system, so you can get the maximum from your Nest Doorbell experience.
The google nest doorbell battery introduces a couple of firsts for Google's doorbell camera lineup—it runs on battery energy and has a unfastened cloud garage alternative. Plus, you do not need a subscription anymore to use maximum of Google's remarkable smart detection features.
How to Remove Google Nest Doorbell?

Preparing to Remove Your Nest Doorbell
Before commencing the removal of your Google Nest Doorbell, it is endorsed to be nicely organized and exercise due protection measures. This preparation prevents any unwanted injuries or issues for the duration of the system and guarantees its success.
Read Also: Unbeatable Black Friday Deals: Google Nest 3rd Generation Thermostat
You may want to take away this sort of doorbell for a number of unique motives consisting of relocation, converting models or maintenance which have turn out to be necessary over time.
To make sure not anything goes wrong at the side of accumulating important gear essential for taking down your doorbell, getting professional help can also show useful if apprehensive approximately getting rid of it yourself.
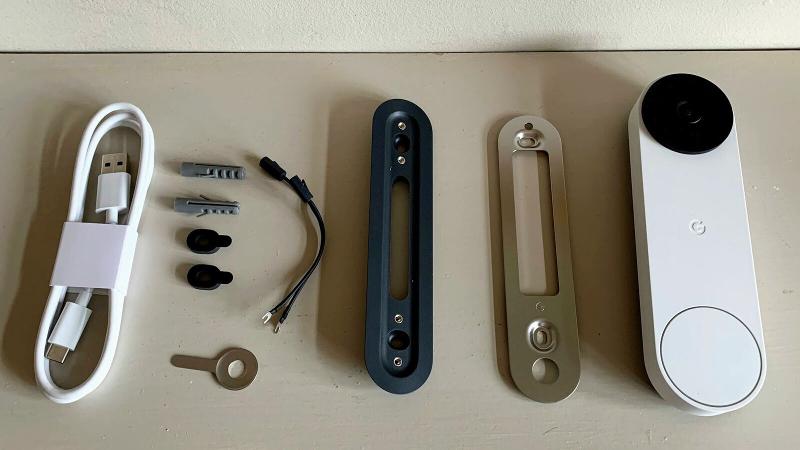
Gather Required Tools
For green removal of a Nest Doorbell, regardless if it's far stressed out or battery-powered, some necessary equipment are essential. The Google Nest has furnished its customers with the release tool to detach their doorbell effortlessly. You can also use a flathead screwdriver as an alternative whilst owning any part of the logo’s product line.
The length doesn’t depend tons for both the release tool blanketed on your container or just simply using the small one from before – each will make sure that doing away with this device gained’t chance unfavorable it or your wall in the course of process.
Safety Precautions
Before starting the eliminating of your Nest Doorbell, safety should be a top precedence. Make positive you turn off the power source and perceive any ability threats or perils, like minute pieces, sharp facets and components constituted of plastic glass metallic, and so on.
Consider that after it's been removed out of your dwelling house there might be protection risks so make sure you have got other security structures in order too.
Removing the Battery-Powered Nest Doorbell
When you’re ready to get rid of your Nest Doorbell, which is first-class battery-powered doorbell, there are 3 primary steps inside the elimination manner. Firstly, make sure the tool has been powered off for protection and unintended activations. In this blog, want to know how to remove google nest doorbell?
Related Article: How to Factory Reset a Google Home Mini?
Once this has been done discover the release mechanism at its top and lightly disconnect it from its wall mount with both a flathead screwdriver or tool furnished upon purchase of nest doorbells. Finally make sure that the whole lot is adequately disconnected earlier than intending with charging batteries as important!
Power Off the Doorbell
Before you're taking out the Nest Doorbell, it's miles crucial to reduce off its power supply for safety motives. Not doing so can reason electric powered shocks or damage on your device and battery, which may result in a fire risk.
To flip off the power from this doorbell at the app, choose one digicam’s live feed and there could be an choice saying ‘turn-off’. Make positive that at the side of switching it of via application. If it’s not battery powered Nest Doorbell then locate the circuit breaker regulating energy flow into doorbell and disable it for that reason too.
Locate Release Mechanism
At the top of the doorbell, a small button seems as a release mechanism. To make certain that the elimination procedure goes smoothly, it's far important to recognise its region and look. Inserting and maintaining an opened up paperclip or thumbtack into reset pinhole located on returned of tool will prompt this launch mechanism.
Gently Detach Doorbell from Wall Mount
Once you've got found the release mechanism, use your device or screwdriver and thoroughly push it into the hole at the wall mount. Gently shrink back from the nest doorbell till it's far detached to avoid any harm to either tool or mounting.
Related Article: How to Manual Update Bose Portable Smart Speaker Pairing 2025?
Make positive that this is performed with exquisite care while dealing with a Nest Doorbell so as no longer to chance tearing down present partitions in a few cases.
This careful elimination technique will enable a hit charging for future use with Nest’s very own unique product line up including their clever domestic objects like door bells and many others.
Charging Your Nest Doorbell
Your Nest Doorbell has been efficaciously disconnected, bearing in mind it to be charged. The technique entails connecting the doorbell with a USB charger and monitoring its development as this guarantees higher overall performance and prolonged battery life.
Connect to Charger
Charging your stressed out Nest Doorbell requires a 7.5W AC adapter or USB-C cable to be linked from the doorbell’s cord terminals and plugged right into a electricity outlet, it commonly takes five hours for the nest doorbell to turn out to be fully charged with this well matched adaptor.
Monitor Charging Progress
It is crucial to examine the development of charging your Nest Doorbell. You can become aware of that it’s being charged if you spot a crimson mild on its front.
To be more certain, check the level of battery in the app and ensure it has been efficiently powered up before reinstalling for high-quality overall performance from your doorbell. Monitoring this technique ensures an premiere rate rate so that all capabilities are to be had with out a issues associated with strength deliver problems.
Reinstalling the Nest Doorbell After Charging
After your Nest Doorbell has been fully charged, you could proceed with the reattachment of the doorbell to its wall mount. Testing it afterward is vital in order for it to have all of its talents and paintings properly again on a full battery charge. By following those steps, you’ll be able to make certain that your tool is again at full functionality as soon as possible!
Reattach to Wall Mount
To properly fix the doorbell, one needs to line up its base with the opening at the bottom of its mounting plate. Once it is correctly located, observe pressure downward till you listen a click on, this suggests that your bell has been adequately secured in place.
Follow those steps for cozy and effective installation of your device in order that it can be used without worry or challenge.
Power On and Test Functionality
Once the Nest Doorbell is reattached to its wall mount, switch it on and make sure the whole thing features efficiently. Indicators of a successful startup are: an properly charged battery with the blue mild on flashing a couple of times before turning off.
Activation of a chime within your property in addition to video photos captured through digital camera related to Wi-Fi keeping constant connection between doorbell and wall.
Troubleshooting Common Nest Doorbell Charging Issues
At times, you could experience some common charging issues together with your Nest Doorbell such as inconsistent battery life or an uncharged device. To ensure peak overall performance of the doorbell is maintained, it’s essential so as to discover and rectify any troubles that stand up.
Doorbell Not Charging
If your google nest wired doorbell is not taking fee, it is vital to assess the cable for strength, doorbell connections and also test whether there’s dust inside the port.
Potential reasons why this can be occurring include a faulty charging wire, unsuitable temperatures or an growing old battery that desires updating. Old firmware can be some other element as properly. Considering all of those factors will help ensure your doorbell can regain its fee properly.
Inconsistent Battery Life
Ensuring your Nest Doorbell has a steady battery lifestyles can be achieved thru altering settings, performing ordinary firmware updates and the use of an appropriate charging practices. Settings will all influence energy drainage in your device inclusive of:
Video Fine
duration of clips taken among recorded occasions interest zones used ensure surest battery overall performance, you need to modify these options as a consequence. To beautify efficiency as regards to power control, updating its Firmware frequently is crucial for prolonging the lifespan of your doorbell’s batteries correctly.
Google Nest Doorbell Maintenance Tips
To guarantee the seamless operation of your google nest wired doorbell, it's miles necessary to conform with positive renovation guidelines. To avoid sudden lack of strength and ensure greatest performance of the doorbell, make sure you automatically check its battery ranges as well as hold updated firmware hooked up on it.
Regularly Check Battery Levels
To ensure your google nest wired doorbell remains green and dependable, it's far important to consistently reveal the battery tiers. You can do that sincerely via Google Home app. Taking movement consisting of changing or recharging if essential will assure its performance without disruption of service.
Keep Firmware Updated
For optimal doorbell overall performance and addressing possible issues, it is important to make sure your Nest Doorbell has the most updated firmware. To try this, pass into settings thru the Nest app and select ‘Software Update’ to your doorbell. Keeping ordinary updates ensures green battery lifestyles in addition to trendy effectiveness of your tool.
Final Thoughts
To know complete guide on how to remove google nest doorbell? By cautiously following the instructions provided here, you can effortlessly charge and reinstall your Nest Doorbell to make certain it performs optimally for a long time period. Maintaining this tool is essential if you want to gain all of the advantages that come with having an efficient domestic security answer like this one from Nest.
FAQ's- Google Nest Wired Doorbell
Is the Google Nest doorbell worth it?
The Nest Doorbell (Battery) is one of the pricier options on the market, however it makes up for the higher rate with subscription-unfastened storage and dynamic smart detection. Plus, it has more inexpensive cloud garage than Ring (when you have a couple of cameras) and higher clever indicators than Arlo.
How do I turn off Google doorbell?
Open the Google Home app. Tap Cameras to view all of your cameras and doorbells, or scroll down and pick a particular one. If the doorbell isn't streaming, faucet Turn on. Or you may tap Turn off to manually prevent streaming.
Is Google doorbell constantly on?
You can turn your Google Nest digital camera or doorbell on or off anytime so that you're constantly on top of things of when it streams and facts video. There are a few methods to interchange your Nest digicam on or off with the app: Manually switch it on or off. Use a digital camera schedule to turn it on or off at precise instances.
Does Google doorbell constantly file?
The Nest Cam (battery) ought to be connected to a power supply to have 24/7 video history. If your digital camera is battery powered, it'll simplest have occasion video history, even if you have a Nest Aware Plus subscription. 24/7 video records isn't always to be had for the Nest Doorbell (battery), despite optionally available stressed out installation.
Why does my Nest doorbell now not ring inside?
Your current settings may also prevent the chime from ringing. For example: Someone who shares get admission to for your Nest home with the app may additionally have grew to become the chime off, or modified the chime duration. If you have a mechanical chime (transferring components that make the sound), the chime duration choice have to be became off.